
How I Created My Git-Spy Web Application using ReactJs
I am a front-end engineer. I build exceptional and problem-solving web applications.
Introduction
Git spy is a web application that implements an API fetch of your GitHub portfolio and shows a page with a list of all your repositories on GitHub. It allows users to keep track of their favorite Git repositories. It can also be used to see a summary of recent activity on a repository. In this blog post, we'll walk through the process of implementing a git-spy web application from start to finish.
Prerequisites that are needed to understand this article are basic knowledge of Git, Github, Repositories, Web applications, and Reactjs.
Overview of the application
Git spy web application uses an API fetch of your GitHub portfolio, showing a page with a list of all your repositories on GitHub. I implemented pagination for the repo list on this page and create another linking page that shows the data for a single repo clicked from the list of repositories using nested routes.
Additionally, I also implemented proper SEO, Error Boundary (showing a page to test the error boundary), and 404 pages.
Setting up the development environment
To get started, you'll need to have Node.js and npm (Node Package Manager) installed on your computer. These are used to manage the JavaScript dependencies for the app. If you don't have them installed, you can download them from the official Node.js website: https://nodejs.org/en/
Once Node.js and npm are installed, you can create a new React app by running the following command in your terminal:
npx create-react-app git-spy-app
This will create a new directory called "git-spy-app" in your current directory, which contains the basic structure for a React app.
Next, you'll need to install some dependencies for routing and error boundary
handling. You can do this by running the following commands in the terminal:
npm install --save react-router-dom
npm install --save react-error-boundary
These dependencies are:
react-router-dom: used for routing pages in the app
react-error-boundary: a library for handling errors that occur within React components
With these dependencies installed, you can start building your Git spy app.
For routing pages, you can use the <Route> component provided by react-router-dom to define different paths in your app and the components that should be rendered for each path.
import Navbar from "./Components/Navbar.jsx";
import {Home, RepoDetails, PageNotFound, ErrorTest} from "./Pages";
import { Routes, Route } from "react-router-dom";

function App() {
  return (
    <div className="App">
      <Navbar />
      <Routes>
        <Route path="/" element={<Home />}>
          <Route path="/repo/:reponame" element={<RepoDetails />} />
        </Route>
        <Route path="/errortest" element={<ErrorTest />} />
        <Route path="*" element={<PageNotFound/>} />
        <Route path="/notfound" element={<PageNotFound/>} />
      </Routes>
    </div>
  );
}

export default App;
For error boundary handling, you can use the ErrorBoundary component provided by react-error-boundary to wrap any components that you want to handle errors for. This component will catch any errors that occur within the wrapped components and display a fallback UI to the user instead of crashing the whole app.
function ErrorFallback({ error }) {
    return (
      <div role="alert">
        <p>Something went wrong:</p>
        <pre className="errorMessage">{error.message}</pre>
      </div>
    )
  }

  export default ErrorFallback;
And that's it! With the development environment set up and the necessary dependencies installed, you should be ready to start building your Git spy app using React.js.
Implementing the front-end
Now we'll go over the implementation of the front end for the Git spy web application using React.js and CSS. We'll cover the main components of the application, such as the Navbar, ErrorFallback, and Pagination components. I also created several pages such as the Home, Repo Details, and 404 pages.
First, let's take a look at the Navbar, which will be the main navigation component of the app. We'll use React Router to define different routes for different pages in the app and create links for each route using the <Link> component.
import React from "react";
import { Link } from "react-router-dom";
import Logo from "../assets/Icons/Logo.svg";

function Navbar() {
  return (
    <nav>
      <div className="logo">
        <img src={Logo} alt="Logo" />
      </div>
      <ul>
        <li className="link">
          <Link to="/">Home</Link>
        </li>
        <li className="link">
          <Link to="/errortest">Error Test</Link>
        </li>
      </ul>
    </nav>
  );
}

export default Navbar;
Additionally, we'll use CSS to implement the look and feel of the navigation bar.
nav {
  position: fixed;
  top: 0;
  width: 100%;
  z-index: 1000;
  display: flex;
  justify-content: space-between;
  align-items: center;
  background-color: #1f197a;
  color: white;
}

.logo {
  width: 100px;
  height: 40px;
  margin: 8px 20px 8px 50px;
}

.logo img {
  width: 100%;
  height: 100%;
}

a {
  text-decoration: none;
  color: white;
  font-size: 16px;
  font-weight: 500;
}

nav ul {
  display: flex;
  justify-content: space-between;
  align-items: center;
  gap: 14px;
  margin-right: 20px;
}

.link {
  position: relative;
}

.link::after {
  content: "";
  position: absolute;
  width: 100%;
  transform: scaleX(0);
  height: 2px;
  bottom: 0;
  left: 0;
  background-color: #ffffff;
  transform-origin: bottom right;
  transition: transform 0.25s ease-out;
}

.link:hover::after {
  transform: scaleX(1);
  transform-origin: bottom left;
}

ul {
  list-style: none;
}
The above code should give you a display like this:

Next, let's consider pagination. This allows the list of repositories to be sectioned so it doesn't display all the repositories at once (which wouldn't look nice). It will allow the user to easily navigate through the repositories.
import { useState, useEffect } from "react";
import { ReactComponent as LeftArrow } from "../assets/Icons/LeftArrow.svg";
import { ReactComponent as RightArrow } from "../assets/Icons/RightArrow.svg";

function Pagination({ numberOfPages, currPage, setCurrPage }) {
  const [disabledPrev, setDisabledPrev] = useState(true);
  const [disabledNext, setDisabledNext] = useState(true);

  const pageNumber = [...Array(numberOfPages + 1).keys()].slice(1);

  const prevBtn = () => {
    if (currPage !== 1) {
      setCurrPage(currPage - 1);
    }
  };

  const nextBtn = () => {
    if (currPage !== numberOfPages) {
      setCurrPage(currPage + 1);
    }
  };

  useEffect(() => {
    if (currPage > 1) {
      setDisabledPrev(false);
    } else {
      setDisabledPrev(true);
    }

    if (currPage === numberOfPages) {
      setDisabledNext(true);
    } else {
      setDisabledNext(false);
    }
  }, [currPage, numberOfPages]);

  return (
    <div>
      <section className="pagination">
        <div className={disabledPrev ? "disabled" : "prev"} onClick={prevBtn}>
          <div className="arrow">
            <LeftArrow />
          </div>
          <p> Prev</p>
        </div>
        <div className="pagination-num">
          {pageNumber.map((num) => (
            <div key={num}>
              <p onClick={() => setCurrPage(num)} className="pagination-child">
                {num}
              </p>
            </div>
          ))}
        </div>
        <div className={disabledNext ? "disabled" : "next"} onClick={nextBtn}>
          <p>Next</p>
          <div className="arrow">
            <RightArrow />
          </div>
        </div>
      </section>
    </div>
  );
}

export default Pagination;
For the Home page, I divided it into 2 sections:
The Aside- to display the details of the user's GitHub profile. It will be responsible for displaying the user data received from the Github API.
The Repo display section -This page will display the list of the user's repositories. We'll also implement a pagination system to allow the user to view more repositories in case they have many.
The above was achieved by running an API call on my Github profile. Below are the code snippets of how this was achieved.
import React from "react";
import { useState, useEffect } from "react";
import { Link, Outlet, useLocation } from "react-router-dom";
import { ReactComponent as Email } from "../assets/Icons/Message.svg";
import { ReactComponent as Location } from "../assets/Icons/Location.svg";
import { ReactComponent as User } from "../assets/Icons/User.svg";
import { ReactComponent as Gist } from "../assets/Icons/Edit.svg";
import { ReactComponent as Message } from "../assets/Icons/Document.svg";
import { ReactComponent as RepoLink } from "../assets/Icons/external-link.svg";
import { ErrorBoundary } from "react-error-boundary";
import { Helmet } from "react-helmet-async";
import ErrorFallback from "../Components/ErrorFallback";
import Pagination from "../Components/Pagination";
import Spinner from "../Components/Spinner";
// import {ReactComponent as Email} from "../assets/Icons/Email.svg";

function Home() {
  const [users, setUsers] = useState({});
  const [currPage, setCurrPage] = useState(1);
  const [repos, setRepos] = useState([]);
  const [repoPerPage] = useState(8);
  const [loading, setLoading] = useState(true);

  useEffect(() => {
    getUser();
    getRepos();
  }, []);

  const api = "https://api.github.com";
  const token = process.env.REACT_APP_GIT_TOKEN;
  const location = useLocation();

  const getUser = async () => {
    const response = await fetch(`${api}/users/PreciousOritsedere`, {
      headers: {
        Authorization: `token ${token}`,
      },
    });
    const data = await response.json();
    setUsers(data);
    setLoading(false);
  };

  const getRepos = async () => {
    const response = await fetch(`${api}/users/PreciousOritsedere/repos`, {
      headers: {
        Authorization: `token ${token}`,
      },
    });
    const data = await response.json();
    setRepos(data);
    setLoading(false);
  };

  if (loading) {
    return <Spinner />;
  }

  const indexOfLastRepo = currPage * repoPerPage;
  const indexOfFirstRepo = indexOfLastRepo - repoPerPage;
  const currRepo = repos.slice(indexOfFirstRepo, indexOfLastRepo);
  const numberOfPages = Math.ceil(repos.length / repoPerPage);

  return (
    <>
      <Helmet>
        <title>Home | Git Spy</title>
        <meta name="description" content="Home page of Git Spy" />
        <link rel="canonical" href="/home" />
      </Helmet>
      {location.pathname === "/" ? (
        <div className="Container">
          <aside>
            <div className="asideContent">
              <div className="profileImg">
                <img src={users.avatar_url} alt="Profile" />
              </div>
              <h1>{users.name}</h1>
              <p className="bio">{users.bio}</p>
              <div className="email">
                <Email />
                <p>{users.email}</p>
              </div>
              <div className="location">
                <Location />
                <p>{users.location}</p>
              </div>
              <div className="Followers">
                <div>
                  <h3>Followers</h3>
                  <br></br> <p>{users.followers}</p>
                </div>

                <User />
              </div>
              <div className="Gists">
                <div>
                  <h3>Gist</h3>
                  <br></br> <p>{users.public_gists}</p>
                </div>

                <Gist />
              </div>
              <div className="publicRepo">
                <div>
                  <h3>Public Repo</h3>
                  <br></br> <p>{users.public_repos}</p>
                </div>

                <Message />
              </div>
            </div>
          </aside>

          <section className="bottom">
            <div className="Right">
              {currRepo.map((repo) => (
                <Link
                  to={`repo/${repo.name}`}
                  key={repo.name}
                  className="repoBox"
                >
                  <div>
                    <div className="repoIcon">
                      <div>
                        <h3>{repo.name}</h3>
                      </div>
                      <div>
                        <RepoLink />
                      </div>
                    </div>
                    <p>{repo.description}</p>
                  </div>
                </Link>
              ))}
            </div>
            <div className="mobilePagination">
              <ErrorBoundary FallbackComponent={ErrorFallback}>
                <Pagination
                  numberOfPages={numberOfPages}
                  currPage={currPage}
                  setCurrPage={setCurrPage}
                />
              </ErrorBoundary>
            </div>
          </section>
        </div>
      ) : (
        <Outlet />
      )}
    </>
  );
}

export default Home;
The above code should give you a display like this(styled with CSS in the index.css file:

Next, I created a nested route that links the user to the Repo details of each of the repo when it is clicked. Below is the code snippet
import { useState, useEffect } from "react";
import { useParams, Link } from "react-router-dom";
import { Helmet } from "react-helmet-async";
import { ReactComponent as LeftArrow } from "../assets/Icons/LeftArrow.svg";
import { ReactComponent as Fork } from "../assets/Icons/Fork.svg";
import { ReactComponent as Language } from "../assets/Icons/Language.svg";
import { ReactComponent as Eye } from "../assets/Icons/Eye.svg";
import { ReactComponent as Folder } from "../assets/Icons/Folder.svg";
import { ReactComponent as Network } from "../assets/Icons/Network.svg";
import { ReactComponent as Subscribers } from "../assets/Icons/Subscribers.svg";
import { ReactComponent as Github } from "../assets/Icons/Github.svg";
import Spinner from "../Components/Spinner";

function RepoDetails() {
  const [repo, setRepo] = useState({});
  const [loading, setLoading] = useState(true);
  const { reponame } = useParams();

  useEffect(() => {
    getRepoDetails();
  }, [reponame]);

  const api = "https://api.github.com";
  const token = process.env.REACT_APP_GIT_TOKEN;

  const getRepoDetails = async () => {
    const response = await fetch(
      `${api}/repos/PreciousOritsedere/${reponame}`,
      {
        headers: {
          Authorization: `token ${token}`,
        },
      }
    );
    const data = await response.json();
    console.log(data);
    setRepo(data);
    setLoading(false);
  };

  if (loading) {
    return <Spinner />;
  }

  return (
    <>
      <Helmet>
        <title>Single Repo Details | Git Spy</title>
        <meta name="description" content="Here you can view the details of the repo you clicked on" />
        <link rel="canonical" href="/repodetails" />
      </Helmet>
      <div className="repoContainer">
        <Link to="/">
          <button className="back">
            <LeftArrow />
            <p> Back to Home </p>
          </button>
        </Link>
        <div className="proj_Name">
          <div className="repoDetails">
            <h2>{repo.name}</h2>
            <p>{repo.description}</p>
            <p> Visibility: {repo.visibility}</p>
            <p>Created @: {repo.created_at}</p>
          </div>
          <button className="back view">
            <a target="_blank" rel="noreferrer" href={repo.html_url}>
              <p>View on</p>
            </a>
            <Github />
          </button>
        </div>
        <h2 className="stats">Stats</h2>
        <div className="statsContainer">
          <div className="statsBox">
            <Fork />
            <p>
              {repo.forks} <span>Forks</span>
            </p>
          </div>
          <div className="statsBox">
            <Language />
            <p>{repo.language}</p>
          </div>
          <div className="statsBox">
            <Eye />
            <p>
              {repo.watchers} <span>view</span>
            </p>
          </div>
          <div className="statsBox">
            <Folder />
            <p>{repo.size} mb </p>
          </div>
          <div className="statsBox">
            <Network />
            <p>{repo.network_count} count </p>
          </div>
          <div className="statsBox">
            <Subscribers />
            <p>
              {repo.subscribers_count} <span>subs</span>
            </p>
          </div>
        </div>
      </div>
    </>
  );
}

export default RepoDetails;
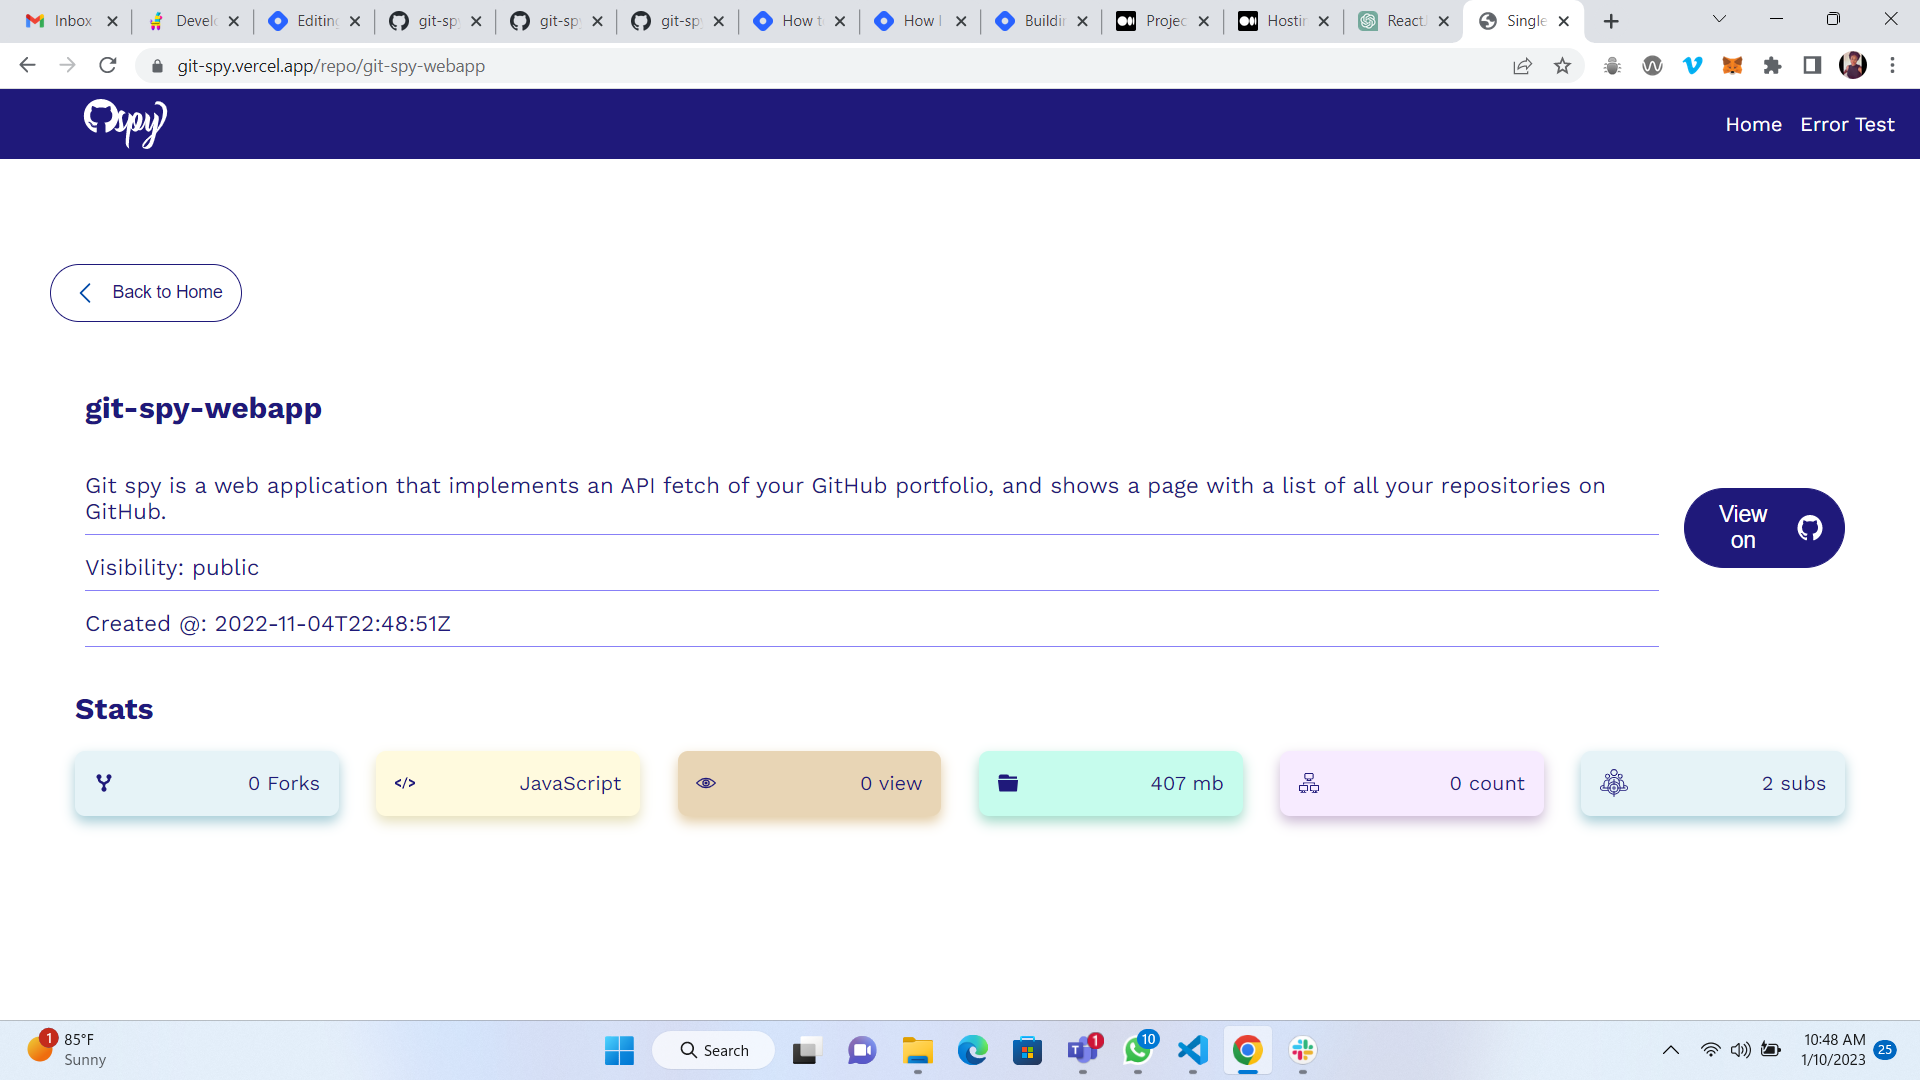
The above code should give you a display like this(styled with CSS in the index.css file:
So far, these are the main components and pages of the Git spy web application.
By using React.js, we can easily create a dynamic, interactive frontend that allows users to search for Github users and view their profiles. And with the help of CSS, we can give the app a polished, user-interactive, and professional look.
Deploying the application
Next, we'll go over the process of deploying the Git-spy web application using Vercel. We'll also discuss some considerations for scaling the application as necessary.
First, you'll need to have a Vercel account. If you don't have one, you can sign up for free at https://vercel.com/. Once you've logged in to your account, you can create a new project and link it to your Git repository where your Git-spy app is stored.
Vercel will automatically detect that you are deploying a React application and set up the appropriate build settings for you. But you can check the settings and configure them to match your application.
Once you've linked your project to your Git repository, Vercel will automatically deploy your app when you push changes to the repository. You can also set up automatic deployments for specific branches, so your app will be updated automatically whenever you push changes to those branches.
Now, for scaling the application, Vercel provides you with a variety of options, like scaling the number of instances of your app, choosing a different type of server, and using a Content Delivery Network (CDN).
Also, you have to consider the usage of your application and plan for the server capacity accordingly. You can also use a service like monitoring and logging to track the performance of your application and identify potential performance bottlenecks (This part is very important when trying to implement the necessary SEO).
Overall, Vercel makes it easy to deploy and scale a web application, but it's important to keep in mind the specific needs of your application and plan accordingly. By understanding the options available to you and choosing the right ones, you can ensure that your application can handle any level of traffic.
Conclusion
So far, I have discussed the process of building a Git spy web application using React.js and CSS.
Git spy is a web application that implements an API fetch of your GitHub portfolio and shows a page with a list of all your repositories on GitHub.
The front end of the application was built using React.js which provides a dynamic and interactive interface. To handle routing and navigation, the react-router-dom library was used. To handle errors that occur within React components, the react-error-boundary library was used.
The application's look and feel were implemented using CSS to style the application and make it visually appealing and user-interactive.
Additionally, I also discussed the process of deploying the application using Vercel and provided some considerations for scaling the application.
For readers who want to learn more about the technologies used in the Git spy web application, some recommended resources are:
React.js:
React's official documentation: https://reactjs.org/docs/getting-started.html
The "React Fundamentals" course on Pluralsight: https://www.pluralsight.com/courses/react-fundamentals
CSS:
Mozilla Developer Network: https://developer.mozilla.org/en-US/docs/Web/CSS
The "CSS Essential Training" course on LinkedIn Learning: https://www.linkedin.com/learning/css-essential-training-3
React-Router-Dom
React Router's official documentation: https://reactrouter.com/web/guides/quick-start
The "React Router" course on Pluralsight: https://www.pluralsight.com/courses/react-router
React-Error-boundary
React-Error-boundary's official documentation: https://github.com/bvaughn/react-error-boundary
"Mastering Error Handling in React" course on Pluralsight: https://www.pluralsight.com/courses/mastering-error-handling-react
Live link of the application: https://git-spy.vercel.app/
Application source code: https://github.com/PreciousOritsedere/git-spy-webapp
If you made it this far, I want to say thank you so much for reading my article. If this was helpful, please leave a comment below.
